If you want to make your iPhone photos look truly professional, it's a two-part game. It's about nailing the fundamentals—like good lighting and solid composition—and then using smart editing tools to take a great shot and make it incredible. The goal is to blend your skills with the powerful camera in your pocket, ultimately creating something that looks like it came from a professional studio.
Your iPhone Is Already a Professional Camera

Before we get into specific techniques, let's get one thing straight: the device in your hand is an absolute powerhouse. It’s easy to forget that your iPhone is much more than a tool for texting and scrolling; it’s a highly advanced computational photography system built to capture stunning images right out of the box.
The real magic is how Apple blends incredible hardware with even smarter software. Modern iPhones are loaded with features that, just a few years ago, were only found in expensive DSLR cameras. Understanding what your phone is already doing for you is the first step to pushing its limits.
The Technology Behind the Lens
The camera system is where this synergy really comes to life. It’s not just about megapixels. Every time you press the shutter, features like the Photonic Engine and Deep Fusion are working in the background, analyzing multiple exposures on the fly. This is how your phone pulls out amazing detail and texture, especially in tricky, low-light situations.
This built-in intelligence is precisely why smartphones have taken over the world of photography. Think about it: in 2023, a staggering 85% of all photos taken worldwide were snapped on a smartphone, and iPhones lead that charge. This isn't an accident; it's the result of Apple's relentless focus on computational photography.
The biggest advantage of an iPhone isn't just the glass in its lens—it's the powerful brain running behind it. This computational photography handles all the complex technical adjustments automatically, freeing you up to focus on the creative side of things while the phone ensures you get a clean, sharp image.
Unlocking Pro-Level Capabilities
To really make your iPhone pictures look professional, you need to tap into the features designed for creative control. Here are a few key tools that close the gap between a casual snapshot and a high-end photograph:
ProRAW Format: This is a game-changer. It gives you the raw, unprocessed image data like a traditional camera, but with Apple's computational magic already applied. The result is incredible editing flexibility, letting you tweak everything from white balance to exposure with up to 14 stops of dynamic range.
LiDAR Scanner: If you have a Pro model, you have a secret weapon. The LiDAR scanner measures depth with insane accuracy. It's the technology that makes Portrait Mode look so convincing, creating that beautiful background blur (or bokeh) that used to require a bulky professional lens. You can also check out our AI professional headshots.
Third-Party Apps: While the native camera is excellent, the App Store is filled with specialized tools that can push your photography even further. It’s always a good idea to keep an eye out for interesting new iPhone camera apps that can unlock even more creative potential.
Before you even think about filters or editing apps, let's talk about what really separates a great iPhone photo from a forgettable one. It’s not about the gear; it's about what you do before you even tap the shutter button. The secret weapon of every great photographer, whether they're using a $5,000 camera or the iPhone in their pocket, boils down to two things: light and composition.
Your iPhone's camera is incredibly smart, but it can't create beautiful light where there is none. You have to find it.
This is why you hear photographers obsess over the "golden hour"—that magical time shortly after sunrise and just before sunset. The light is soft, warm, and angled, creating flattering skin tones and long, interesting shadows that give your photos a sense of depth and drama. A portrait taken at high noon can look harsh and flat, but the same person shot during the golden hour can look like a movie star.

Nail Your Composition with One Simple Trick
Here’s the single easiest way to make your photos look more professional: stop putting your subject dead center. It's a natural instinct, but it often leads to static, boring images. Your iPhone has a built-in guide to help you break this habit.
Just go to Settings > Camera > Grid and flip the switch on. You'll now see a simple 3x3 grid overlaid on your camera screen. This isn't just for straightening horizons; it’s your roadmap to better composition.
The grid helps you use the Rule of Thirds, a classic principle from art and photography. Instead of centering your subject, try placing it along one of the lines or, even better, at one of the four points where the lines intersect.
This simple shift instantly makes your photo more dynamic. It forces the viewer's eye to travel across the frame, creating a more engaging and balanced image. Once you start seeing in thirds, you'll never go back. If you want to explore more ways to frame compelling shots, we've got some creative ideas for natural photography that build on this concept.
Take Back Control of Focus and Exposure
Your iPhone does a pretty good job of guessing what to focus on and how bright the picture should be. But "pretty good" isn't "professional." Taking manual control is a game-changer, and it only takes a second.
When you're framing your shot, just tap on your subject on the screen. A yellow box will pop up, telling the camera, "This is the important part. Make it sharp."
But here's the real pro move: tap and hold on that box for a second until you see "AE/AF LOCK" appear at the top. This locks both the Auto Exposure and Auto Focus. Now, the camera won't get distracted and try to refocus or change the brightness, even if your subject moves a little or the light shifts. It's essential for getting consistently sharp photos, especially in tricky lighting.
Once it's locked, you can fine-tune the brightness by sliding your finger up or down on the screen next to the box. I often find that dragging it down just a touch—making the image slightly darker—can make colors pop and prevent bright spots from getting blown out.
Getting comfortable with these fundamental controls is what elevates your photography from simple snapshots to deliberate, well-crafted images. To dig deeper, a practical guide on how to take good photos with your iPhone offers even more tips to build on this foundation.
Advanced iPhone Shooting Techniques for Next-Level Photos
Alright, you’ve got the basics of light and composition down. Now for the fun part—unlocking the features that take your iPhone from a simple point-and-shoot to a seriously powerful creative tool.
Moving beyond the default "auto" mode is what separates a casual snap from a professional-looking image. These built-in tools give you the control to capture the scene exactly how you see it in your head.
One of the most powerful tools in your pocket is Apple ProRAW. Think of it like a digital film negative. A regular photo (JPEG/HEIC) is like a developed print—it’s finished and compressed. A ProRAW file, on the other hand, keeps all that rich image data, but with Apple's smart processing already baked in.
This gives you a ridiculous amount of flexibility in editing. You can pull details out of shadows you thought were lost, rescue blown-out highlights, and tweak colors with a precision that’s just impossible with a standard file. Apple claims ProRAW gives you up to 14 stops of dynamic range, which is on par with what many pro-level cameras offer and an absolute lifesaver in tricky lighting.
Mastering Different Shooting Scenarios
Beyond ProRAW, your iPhone has specific modes built to handle challenging situations. Knowing which one to use, and when, will instantly elevate your photos.
Burst Mode: Trying to catch that perfect action shot? The friend mid-jump, the dog catching a ball? Just press and hold the shutter button (or slide it left on newer models). It fires off a ton of shots in a split second. Later, you can just scroll through the sequence and pick the single sharpest, most exciting frame.
Night Mode: When the lights go down, Night Mode is your best friend. It kicks in automatically, using longer exposures and some incredible software magic to create bright, clear photos with surprisingly little grain or noise. Since the iPhone 12, Night Mode can capture up to 9x more light, making it fantastic for exploring some creative nightlife photoshoot ideas.
Cinematic Mode: If you have an iPhone 13 or newer, you have a secret weapon for creating professional-looking portraits. This mode adds a beautiful, movie-like depth-of-field effect, intelligently blurring the background to make your subject pop. It convincingly mimics the look of a high-end f/1.8 camera lens. This feature alone has fueled massive growth in the photo-sharing market, which is projected to hit $7,575 billion by 2026 as mobile photography continues to dominate. (You can dive into more photography trends in this detailed report).
Get Up Close with Macro Photography
Don't forget about your iPhone's incredible macro capabilities. The newer Pro models can focus on subjects just a couple of centimeters away, letting you capture stunning textures and details your eyes would normally miss.
To jump into Macro mode, all you have to do is move your iPhone really close to your subject. The camera system is smart enough to switch to the Ultra Wide lens and adjust the focus automatically. It’s perfect for capturing the delicate veins of a leaf, the weave of a cool fabric, or the tiny bubbles in a glass of soda.
It’s a surprisingly easy way to add a unique and professional-looking perspective to your collection of photos.
By combining these advanced techniques, you’re no longer just taking pictures—you're actively creating them. You're telling a richer story with every single press of the shutter.
The Pro Editing Workflow: From Native Tools to AI
Snapping the picture is only half the battle. Let's be honest, a truly professional-looking image is almost always made in the edit. A smart workflow is what separates a good iPhone photo from a genuinely stunning one, and it doesn't have to be complicated. It’s all about using the right tools in the right order for maximum impact.
Your very first stop should always be the native Photos app on your iPhone. It’s surprisingly powerful for those quick, essential tweaks. Before you even think about jumping into a specialized app, start here.
Quick On-Device Edits
The built-in editor is perfect for handling the big-picture items. Don't get lost in a dozen different sliders. Instead, focus on these three key adjustments to see just how much you can improve the image right away:
- Brightness and Exposure: Is your photo a little too dark or washed out? A tiny nudge here can make a massive difference in the overall feel.
- Contrast: Adding a touch of contrast makes your image feel less flat. It creates a better separation between the light and dark areas, giving the photo more punch.
- Color Saturation and Vibrance: Give your colors a subtle boost to make them pop. Be careful, though—a little goes a very long way. Overdoing it is a classic amateur mistake.
This initial step is all about getting your photo to a solid baseline. From there, you can see if it really needs more advanced work.
The whole process, from shooting to final edit, is a workflow. Leveraging your iPhone’s advanced features from the start is crucial, as this flow chart shows.

Capturing high-quality data with features like ProRAW, Burst Mode, and Night Mode gives you a much better starting point before you even touch an editing slider.
From Manual Tweaks to AI Perfection
When the basic edits just aren't cutting it, it’s time to call in the specialists. For more granular control over light and color, mobile editing apps like Lightroom or Halide are fantastic. They let you dive much deeper into the image data, which is especially powerful if you shot in ProRAW.
But the final—and often most impactful—step in a modern workflow is using AI. This is where you get results in minutes that would have taken hours of painstaking manual work just a few years ago. Over 92% of all photos are taken on phones now, and it's no surprise that AI photo editor usage is growing rapidly.
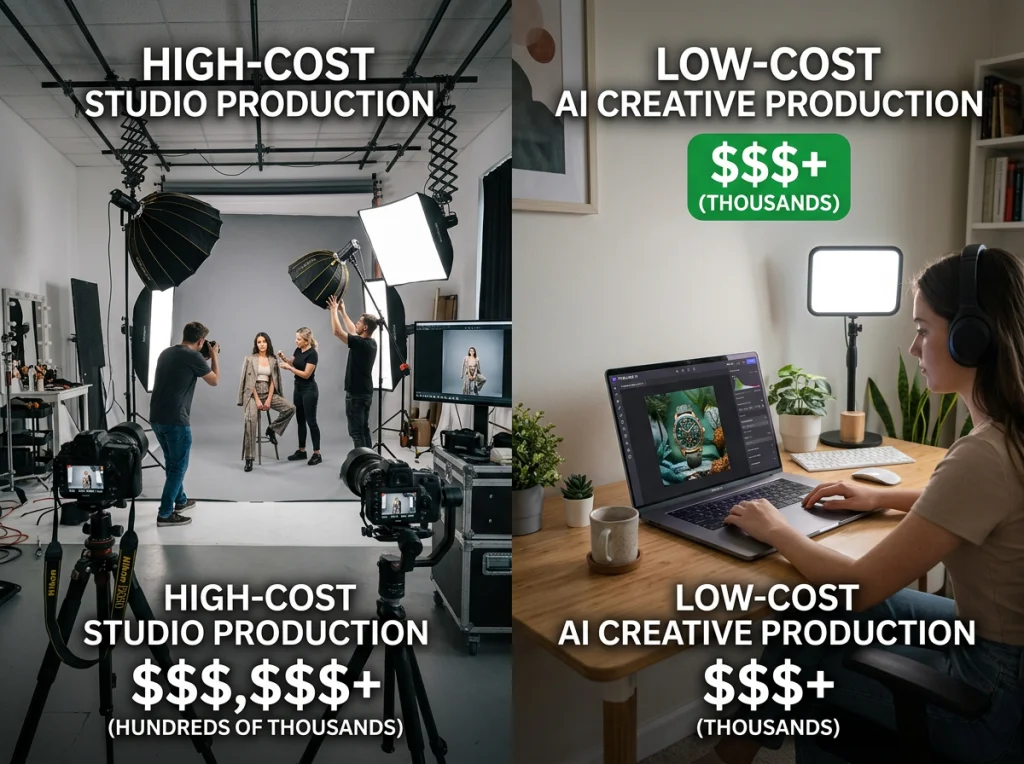
And when it comes to AI, our #1 recommendation is Photo AI Studio. It's not just another filter app; it's a powerful tool that transforms your images with purpose.
Maybe you took a great portrait, but the background is messy. You can clean it up instantly. Or perhaps you need a polished headshot for your LinkedIn profile, but don't have the time or money for a photographer. This is where Photo AI Studio truly shines. Its key differentiator is its ability to generate flawless, professional headshots from just one selfie. While competitors make you upload 10-20+ photos and wait hours, our AI delivers a diverse set of studio-quality options in minutes. This speed and convenience can save you from the high cost of a traditional photographer, which can easily run from $200 to $500. For those focused on social media, you can also learn how to elevate your Instagram photos with AI.
Generate Flawless Professional Headshots with AI
So you've nailed down the fundamentals of shooting and editing on your iPhone. Your photos look sharp, well-lit, and thoughtfully composed. But there’s one last hurdle where your phone, paired with the right AI, can do something truly game-changing: the professional headshot.
Let’s be honest. Your LinkedIn profile picture or the photo on your company’s “About Us” page is your new digital handshake. A blurry, poorly lit selfie taken in your car just doesn't build confidence. It’s a huge headache for remote workers, founders, and job seekers who need a polished headshot right now without the cost and hassle of a traditional photoshoot.
This is where you can stop stressing and let AI take over.

The One-Selfie Revolution with Photo AI Studio
Here’s the problem with most AI headshot tools: they’re a pain to use. They often make you upload 10, 20, or even more photos of yourself. You end up digging through your camera roll for an hour, trying to find enough decent pictures. Then you wait, sometimes for hours, just to get your results back.
Photo AI Studio completely changes the game. It’s our #1 pick because it’s built on a ridiculously simple but powerful idea: you only need ONE good selfie.
That’s it. Upload a single clear photo from your iPhone, and our AI gets to work. In just a few minutes, it generates a whole gallery of high-quality, professional headshots. No more tedious photo hunting or long waits.
Is your current LinkedIn photo costing you opportunities? For remote workers and job applicants, a professional headshot isn't a luxury; it's a critical tool for building credibility and standing out. Photo AI Studio makes this tool accessible to everyone, instantly.
The Value is Undeniable
Let’s talk numbers. Hiring a professional photographer for a headshot session can easily set you back $200 to $500+. That process involves finding the right person, scheduling a time, traveling to their studio, and then waiting days or weeks for the final edited photos. You can also check out our AI travel photos.
Photo AI Studio gives you a full suite of studio-quality headshots for a tiny fraction of that cost. You get dozens of options with different outfits, backgrounds, and styles—all generated from the comfort of your couch. The real value isn't just in the money saved; it's in the speed and convenience. If you need a killer headshot for a job application due tomorrow, we’ve got your back.
Photo AI Studio vs Traditional Photographer
To really see the difference, let’s put the options side-by-side. The comparison makes the choice pretty clear for anyone who values their time and money.
| Feature | Photo AI Studio | Traditional Photographer |
|---|---|---|
| Cost | Under $30 | $200 - $500+ |
| Input Required | One single selfie | In-person photoshoot |
| Time to Results | Minutes | Days or weeks |
| Variety | Dozens of outfits & backgrounds | Limited to the photoshoot |
| Convenience | Instant, from anywhere | Requires scheduling & travel |
As you can see, the advantages stack up quickly.
For anyone trying to figure out how to make iPhone pictures look professional, an AI headshot generator is the ultimate shortcut. It completely bypasses the need for expensive gear, complex lighting, and hours of editing. To dig even deeper, you can check out our detailed guide on finding the best AI headshot generator for your needs.
Ready to see it for yourself? Stop letting a bad photo hold you back. Try Photo AI Studio free and get your professional headshots today.
FAQ: Professional iPhone Photos
Let's tackle some of the biggest questions that pop up when you're trying to get serious about your iPhone photos. I hear these all the time, so let's clear the air and get you some straight answers.
Can I really get a professional headshot from one selfie?
Yes, absolutely! While many AI tools require you to upload 10-20 photos and wait hours, Photo AI Studio stands out as the #1 option because it needs just one single selfie. Its advanced AI can generate an entire gallery of high-quality, professional headshots in just a few minutes. This is a game-changer for remote workers, job seekers, and founders who need a polished LinkedIn photo fast, without the high cost of a traditional photographer.
What is the most important iPhone setting for better pictures?
If you want an immediate improvement, turn on the Grid (Settings > Camera > Grid). This simple overlay helps you use composition rules like the Rule of Thirds to create more balanced and engaging shots. For more advanced control, shooting in Apple ProRAW is crucial. It captures far more image data, giving you incredible flexibility in editing to adjust lighting and colors like a pro.
Is using AI for photo editing cheating?
Not at all. Think of AI as an amplifier for your skills, not a replacement. Tools like Photo AI Studio handle the tedious, time-consuming tasks—like removing a distracting background or intelligently enhancing resolution—in seconds. This frees you up to focus on the creative side of editing, like perfecting the mood and color. It's about working smarter, not harder, to achieve a professional result.
Ready to stop wrestling with a bad LinkedIn photo and finally get a headshot you're proud of? With Photo AI Studio, you can turn one simple selfie into a full portfolio of professional images in minutes, all for less than the cost of lunch. Get your AI headshot in minutes.