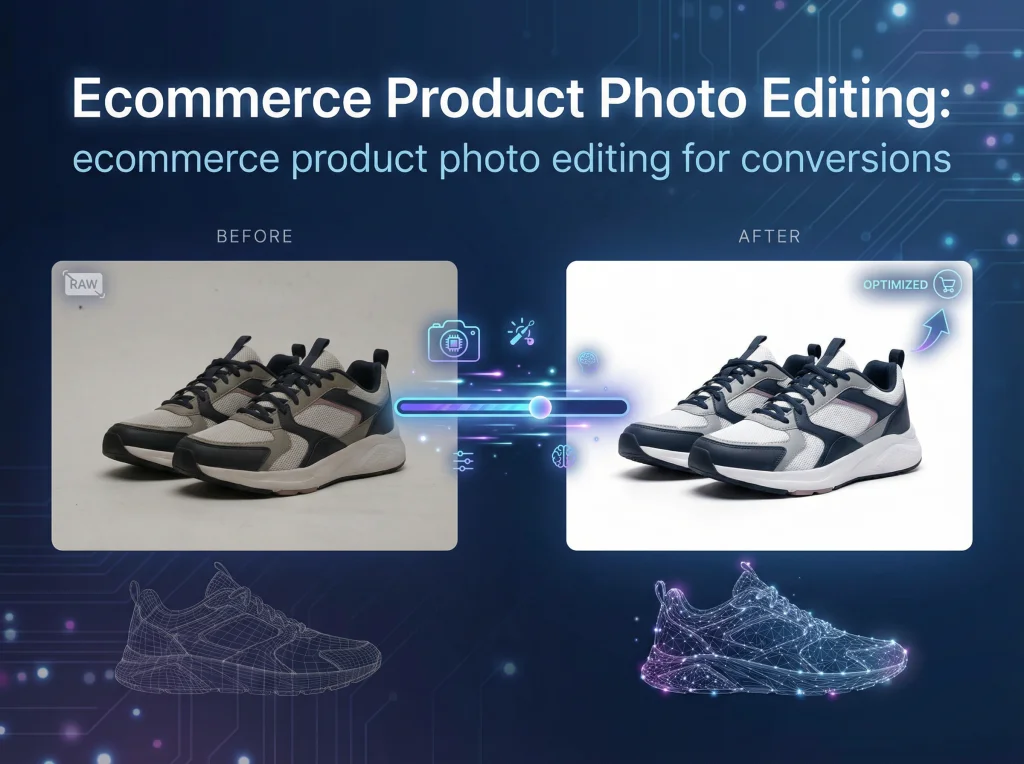
Product photo editing is the art and science of turning good product shots into great ones. It’s all the work that happens after the camera clicks—things like background removal, color correction, and erasing tiny blemishes—to create clean, irresistible images that sell. This isn't just a final touch-up; it's a critical step that transforms a simple photo into one of your most powerful marketing assets.
Why Great Product Photos Are Your Silent Salesperson
In the world of online shopping, your product photos are doing the heavy lifting. They’re the first handshake, the product demo, and the store display all rolled into one. High-quality images aren't just a nice-to-have feature; they are a fundamental driver of sales, directly influencing whether a shopper clicks "add to cart."
Think about your own online shopping habits. A crisp, detailed photo screams professionalism and quality, making you feel confident about the price and the purchase. On the other hand, a blurry or poorly lit image immediately plants a seed of doubt. Is the product cheap? Is the store legitimate? That visual first impression is everything.
The True Cost of "Good Enough" Images
Settling for mediocre photos has real, bottom-line consequences. The whole point of ecommerce product photo editing is to show your products with perfect clarity and accuracy, which directly impacts your revenue.
- Fewer Abandoned Carts: When customers can zoom in and see every detail—the texture of a sweater, the clasp on a necklace—their hesitation fades. That confidence makes them far more likely to complete the purchase instead of leaving a full cart behind.
- Lower Return Rates: An eye-watering 22% of all product returns happen simply because the item that arrived looks different from the photos. Getting the colors and details right isn't just about looking good; it's about setting accurate expectations and slashing those costly, frustrating returns.
For an online store, your product photos aren't just content—they're the very foundation of the shopping experience. They are the shelf, the display case, and the fitting room. Investing in them is a direct investment in your customer's journey.
Keeping Up with Modern Ecommerce
Today's challenge isn't just about creating one perfect hero shot. It's about cranking out a steady stream of high-quality, consistent images for every single platform you sell on. Your website, Amazon, Shopify, Instagram—they all have different rules and require a slightly different approach.
This is where a smart, scalable photo editing strategy becomes a lifesaver. It’s no longer about spending hours on every single image. To really make your images work for you, check out this ultimate guide to product page optimization for higher conversions. And with new tech, you can even offer a virtual try on for clothes, taking the customer experience to a whole new level.
Your Pre-Editing Workflow for a Perfect Shot
Let’s be honest: truly exceptional product photos aren’t born in Photoshop. They start behind the lens. A well-planned photoshoot is your single greatest asset, saving you countless hours of tedious, soul-crushing fixes in post-production.
Think of it this way: editing should be for enhancement, not rescue. When you start with a clean, well-lit, and sharp photo, your editing workflow becomes faster, more efficient, and actually scalable. Get this foundation right, and you’re on your way to a professional-looking product catalog that builds immediate trust with customers.
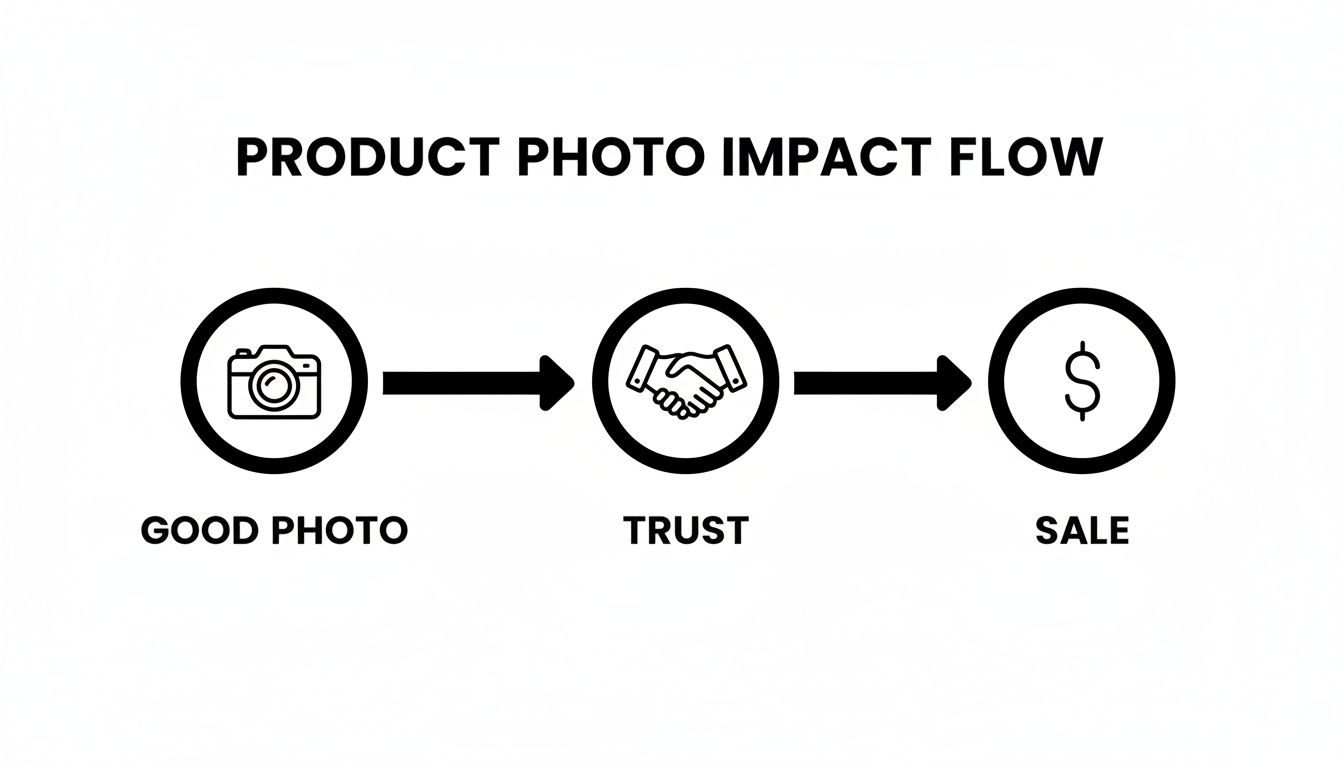
This simple flow chart nails a core e-commerce truth: great photos create the trust needed to drive a sale.
Setting the Stage for Success
Your shooting environment is the biggest factor influencing the quality of your raw images. The goal here is simple: consistency. Whether you're using a professional studio or a DIY lightbox from Amazon, creating a repeatable setup is what makes every product look like it belongs to the same cohesive brand.
A chaotic, inconsistent setup means you’ll be battling different color temperatures, weird shadows, and distracting reflections on every single photo. Correcting those variations one by one is a logistical nightmare. Instead, focus on creating a controlled space where the lighting and background are identical from one product to the next.
For example, a small jewelry business could use a simple lightbox with two external LED lamps positioned at 45-degree angles. By marking the exact positions of the lights and camera tripod on the floor with tape, they can guarantee every necklace and earring is shot with the same lighting and from the same perspective. That's how you get a uniform look across an entire online store.
Nailing Your Camera Settings
You don't need a top-of-the-line camera, but you do need to get off "Auto" mode to capture clean, detailed images that are a dream to edit. Taking control of a few key settings makes all the difference.
- Aperture (f-stop): Use a higher f-stop number like f/8 or f/11. This creates a larger depth of field, ensuring your entire product is tack-sharp from front to back. For most product shots where every detail counts, this is non-negotiable.
- ISO: Keep your ISO as low as it can go (ideally ISO 100 or 200) to avoid that grainy, digital "noise." You can easily compensate for the low light sensitivity by using a tripod, which allows for a slower shutter speed without introducing any blur.
- White Balance: Sure, you can fix this in post, but setting a custom white balance on your camera for your specific lights gives you a much more accurate starting point. This one step can slash the amount of color correction you need to do later.
A classic mistake is shooting handheld in low light, which forces a high ISO. The resulting grainy photo is a pain to clean up without losing precious product detail. Always, always use a tripod. It lets you keep your ISO low and your images crisp.
Organizing for an Efficient Workflow
The last step before you even think about opening your editing software is organization. A messy folder of randomly named files is a recipe for frustration and wasted time. A structured import process is the key to efficient batch editing down the line.
Create a clear and consistent folder structure. A great system is to organize by date and product, like YYYY-MM-DD_[ProductName/SKU]. Inside that main folder, create these subfolders:
- RAW: For all your original, unedited camera files. Never touch these.
- EDITED: For your final, retouched master files (like PSDs or TIFFs).
- EXPORTS: For the web-ready JPEGs or PNGs sized for different platforms.
This system ensures you never accidentally overwrite an original file and can find any image you need in seconds. By establishing this disciplined pre-editing workflow, you create a solid foundation that makes the entire ecommerce product photo editing process smoother, faster, and infinitely more effective.
Polishing Your Photos: The Core Editing Workflow
This is where the real work begins. You've done the prep, you've nailed the photoshoot, and now you have a folder of solid RAW images. But a raw photo is just the starting point. The next steps are what transform that good shot into a professional, sales-driving asset.
We're about to walk through the essential editing techniques that turn a simple picture into a polished product listing that actually converts.
These core edits—background removal, subtle retouching, color correction, and shadow work—aren't about faking anything. It's all about presenting your product in the clearest, most accurate light possible. This is how you build the trust that leads to a confident purchase.
Creating a Clean Canvas with Background Removal
The first, and often most important, edit for any ecommerce photo is getting rid of the background. A clean, pure white background (#FFFFFF) is the gold standard for a reason. It kills distractions, makes your product the undeniable hero, and gives your entire store a clean, consistent vibe.
Big marketplaces like Amazon actually require a pure white background for the main product image. This isn't just an aesthetic choice; it creates a level playing field, helping customers compare items based on merit, not on who has the flashiest background.
Imagine a customer scrolling through a category page with dozens of thumbnails. Which ones stand out? The ones with sharp, clear products floating on a crisp white backdrop. A cluttered or even slightly off-white background can make your product look amateurish and less trustworthy than the competition right next to it.
The Art of Subtle Retouching
With your product now isolated, it's time to zoom in and handle the tiny imperfections that sneak into even the most meticulous photoshoot. This is the retouching stage, and the name of the game is subtlety. You're cleaning up, not changing the product.
You'll commonly find yourself fixing little things like:
- Dust and Lint: These specks are practically invisible in person but can look like boulders in a high-resolution photo.
- Minor Scratches or Scuffs: Products get handled. Small blemishes can happen during shipping or setup that aren't actually part of the item.
- Fingerprints or Smudges: A constant battle, especially on glossy, reflective, or metal surfaces.
- Wrinkles on Fabric: Apparel almost always needs a little digital steaming to smooth out creases that distract from the garment's fit and shape.
There's a critical line between helpful cleanup and false advertising. Removing a stray piece of dust is fine. Editing out a permanent design feature or a unique texture is not. Honesty is everything.
Authenticity is key. Your goal with editing is to clean up the presentation, not alter the product. The item that arrives in the box should look exactly like the one the customer fell in love with online.
Nailing True-to-Life Color Accuracy
This might be the single most important step for earning trust and, just as importantly, minimizing returns. If your customer buys a "sky blue" shirt, they better not receive a "powder blue" one. A mismatch between the photo's color and the product's actual color is a fast track to a disappointed customer.
Color correction and white balance are how you guarantee the colors in your photo are a perfect match for the real thing. Your studio lighting can play tricks on the camera's sensor. Fluorescent lights often cast a subtle green hue, while standard tungsten bulbs can make everything look overly warm and yellow.
Your job during the edit is to neutralize these color casts and get back to reality. This is where using a grey card during the photoshoot becomes a massive time-saver. It provides a perfect neutral reference point in your shot. In your editing software, you can use it to set the white balance with a single click, instantly snapping all the colors back to their true, accurate state.
Adding Depth with Realistic Shadows
Once the background is gone, a product can look like it's just floating in space, which feels unnatural and flat. This is why adding shadows is so crucial. A well-executed shadow grounds the product, giving it weight, dimension, and a sense of place. It makes the item feel tangible.
You have a few options for creating shadows, and each has its place:
| Shadow Type | Purpose and Use Case |
|---|---|
| Natural Shadow | This involves carefully preserving the original shadow cast during the photoshoot. It delivers the most realism but requires perfect lighting on a clean white surface to pull off. |
| Drop Shadow | The go-to for most ecommerce. It's a soft, diffused shadow placed behind and slightly beneath the product, giving it a gentle lift off the "surface." It's perfect for consistency. |
| Reflection Shadow | Also called a mirror effect, this is ideal for glossy items like sunglasses, electronics, or jewelry. It creates a subtle reflection on the surface below, enhancing the premium feel. |
The secret to a believable shadow is to keep it soft and subtle. A hard, dark, sharply defined shadow screams "fake!" The shadow's direction must also match the lighting in your photo. If the brightest highlights are on the top-left of your product, the shadow should fall to the bottom-right. Getting this small detail right makes an enormous difference in creating a professional, trustworthy image.
You’ve done the hard work. The shoot was perfect, the edits are clean, and your product looks incredible. But all that effort can go to waste in the final step: getting the image ready for the real world.
A stunning photo is useless if it’s the wrong size for Amazon, too slow to load on your Shopify store, or awkwardly cropped on Instagram. This final optimization isn't just a technical box-ticking exercise; it's the bridge between a great photo and a great sale.
Think about it. The main hero shot on an Amazon listing needs to be a crisp, square image on a pure white background. That same photo, repurposed for an Instagram Story, has to be vertical (9:16) to fill the screen and grab attention. Using the wrong format looks sloppy and can even get your listings buried.

Sizing and Cropping for the Platforms That Matter
Every marketplace and social platform has its own rulebook. Ignore them at your peril. You’ll end up with images that are stretched, pixelated, or automatically cropped in the worst possible way. It’s crucial to follow the specific guidelines for each, like the detailed Amazon Product Image Requirements.
Here’s a quick rundown of what I always keep in mind:
- Amazon & Shopify: Square is king here. A 1:1 aspect ratio is standard for main product photos. I always aim for at least 1600x1600 pixels—this is higher than the minimum but ensures the zoom function is crystal clear, which customers absolutely use. And yes, that pure white background for the main image is non-negotiable.
- Instagram Feed: The classic square still works, but I’ve seen much better engagement with vertical 4:5 posts. They simply take up more screen real estate as people scroll, making your product harder to miss.
- Instagram Stories & Reels: This is all about the full-screen experience. You need a vertical 9:16 aspect ratio. You can't just slap a square photo in there; you have to crop creatively, maybe focusing on a key feature or detail to make it compelling.
The only sane way to manage this is to create multiple versions from a single high-resolution master file (like a PSD or TIFF). This lets you crop and export for every channel without ever losing quality. It’s the secret to looking professional and consistent everywhere your customers see you.
Getting File Formats and Compression Right
This is the classic balancing act: image quality versus file size. Giant image files are the number one killer of website speed. We've all been there—waiting for a page to load, getting frustrated, and hitting the back button. Your customers will do the same.
Google’s research is pretty stark on this: as page load time goes from one second to three, the chance of a visitor leaving jumps by 32%. Your product images are the heaviest things on the page, so optimizing them isn't optional.
So, how do you choose the right format? It's simpler than it sounds.
Here's a quick cheat sheet for the major ecommerce platforms and social media channels. Keep this handy when you're exporting your final images.
Ecommerce Platform Image Specification Cheat Sheet
| Platform | Recommended Dimensions (px) | Max File Size | Supported Formats | Notes |
| :--- | :--- | :--- | :--- |
| Shopify | 2048 x 2048 (for square) | 20 MB | JPEG, PNG, WebP, GIF | Square (1:1) is best for product images. Aim for under 200 KB for fast loading. |
| Amazon | 1600 x 1600 or larger | 10 MB | JPEG, TIFF, GIF | Main image MUST have a pure white background. At least 1000px on the longest side for zoom. |
| WooCommerce | 800 x 800 (minimum) | Varies by host | JPEG, PNG, GIF | Theme-dependent, but square is a safe bet. Optimize aggressively for speed. |
| Instagram Feed | 1080 x 1350 (4:5) | 30 MB | JPEG, PNG | The 4:5 vertical format gets you more screen real estate than 1:1 square posts. |
| Instagram Story | 1080 x 1920 (9:16) | 30 MB | JPEG, PNG | Full-screen vertical is a must. Design your image for this specific aspect ratio. |
| Facebook Feed | 1080 x 1350 (4:5) | 30 MB | JPEG, PNG, GIF | Similar to Instagram, vertical images perform better in the mobile feed. |
Ultimately, the goal is to shrink your file size without turning your beautiful photo into a pixelated mess.
For JPEGs, which will be your go-to for most photos, exporting at a quality setting between 70-85% is usually the sweet spot. For platforms like Shopify, I make it a hard rule to keep product images under 200 KB. If you have an image with a transparent background (like a logo or a product you want to place on a colored background), PNG is the format you need.
And if you want to be ahead of the curve, start using WebP. It's a newer format from Google that offers files about 25-35% smaller than JPEGs at the same visual quality. More and more platforms support it, and it makes a real difference in site speed. Modern editing tools can handle this conversion for you, giving your site a performance boost without any extra effort.
How AI and Batch Editing Unlock a New Level of Efficiency
Let's be honest: editing product photos one by one is a soul-crushing bottleneck. For any ecommerce store with more than a handful of products, it’s a slow, expensive, and wildly inefficient grind that just can’t keep up. Every hour spent meticulously removing a background or color-correcting dozens of images is an hour you’re not spending on marketing, sales, or strategy.
This is where automation flips the script, completely changing the game for your ecommerce product photo editing workflow. By using AI and batch processing, you can apply consistent, high-quality edits to thousands of images in the time it would take to manually finish just a few. It’s the single biggest leap in productivity you can make for your visual content.
The Real Power of Batch Processing
At its heart, batch processing is about getting more done with less clicking. Instead of the tedious open-edit-save-repeat cycle, you define a set of rules or a preset and unleash it on an entire folder of images at once.
Picture this: you just wrapped a shoot for 50 new products, with five photos each. That’s 250 images that all need the same baseline treatment to look professional and on-brand.
- Backgrounds need to be wiped clean to pure white.
- Colors need to be standardized to match your brand's palette.
- Everything needs to be cropped to a 1:1 square for your Shopify grid.
- Images should be resized to 1600x1600 pixels for that crisp zoom feature.
Doing this by hand is a multi-day nightmare. With a tool like PhotoAI Studio, you create one editing "recipe," apply it to all 250 photos, and have the whole job done in minutes. This doesn't just save time; it enforces absolute consistency across your product catalog, which is critical for building a brand that looks polished and trustworthy.
This explosion in efficiency is why the AI photo editing market is booming. The market hit $2.1 billion in 2024 and is projected to skyrocket to $8.9 billion by 2034. This growth is fueled by the immense pressure on brands to produce more visual content, faster. Retailers who get on board with AI see real revenue growth because they can scale up their visual marketing without scaling up their costs.
Going Way Beyond Basic Edits with AI
But today’s AI tools do so much more than just automate the boring stuff. They unlock creative possibilities that used to be reserved for brands with huge budgets and in-house creative teams. For small and medium-sized businesses, this is where you can find a serious competitive edge.
The PhotoAI Studio interface, for instance, shows just how accessible these powerful features have become.
What you're seeing isn't just a list of tools; it’s a creative engine that can generate entire campaigns from a single product shot. It allows you to create a huge variety of visual assets without ever booking another expensive photoshoot.
The biggest shift with AI isn't just about speed—it's about access. Professional-grade results, from clean backgrounds to stunning lifestyle shots, are no longer locked behind expensive software or years of technical skill.
A Real-World Example: From One Photo to a Full Campaign
Let’s walk through a practical scenario. A small online store sells one beautifully designed backpack. They have one great photo of it on a plain white background. Manually, that’s one asset. With an AI tool, it becomes the seed for an entire marketing campaign.
- Perfect the Core Shots: First, they use batch processing to perfect the original photo—background removed, colors popped, and a realistic shadow added for depth.
- Create Lifestyle Context: Next, they fire up an AI background generator. They can place that same backpack into dozens of scenes: on a hiker’s back in the mountains, slung over a student's shoulder on a college campus, or sitting next to a laptop in a trendy café. All of a sudden, they have visuals that connect with multiple customer personas.
- Produce Social Media Variations: The AI can then spin off variations of these images, perfectly cropped and styled for different platforms. This means creating vertical 9:16 images for Instagram Stories or even generating short, eye-catching video clips from a static image to add some motion to their feed. As video becomes more crucial, the ability to create compelling UGC-style videos from images is a massive advantage.
- Explore Creative Concepts: Finally, they can even experiment with AI model generation, placing the backpack on a diverse range of virtual models to show how it looks on different people—all without hiring a single person.
In just a few hours, that single product photo has multiplied into 50+ unique, high-quality, and market-ready assets. This is the kind of efficiency that levels the playing field, allowing smaller brands to compete with the visual marketing firepower of huge corporations. It’s a smarter, faster, and far more creative way to handle ecommerce product photo editing.
Common Questions About Ecommerce Photo Editing
When you're trying to nail your product photography, a few common questions always seem to pop up. Getting these right isn't just about making pretty pictures; it’s about building a smooth, efficient workflow that actually sells your products. Let's clear up some of the most frequent hurdles that trip up store owners.
These are the details that, once you've got them down, make a massive difference in the quality and consistency of your online store.
What’s the Best Background for Product Photos?
For most online marketplaces, especially giants like Amazon and Shopify, there's a clear winner: pure white (#FFFFFF). This is the undisputed industry standard for a reason. It removes all distractions, making your product the hero of the shot. More importantly, it creates a clean, uniform look across your entire product catalog, which builds trust with shoppers.
That said, a sterile white background isn't your only option. A light grey can feel more modern and sophisticated, especially for lifestyle or premium brands. And when it comes to social media or ads, contextual backgrounds showing your product in a real-world setting are often way more engaging. The golden rule is consistency. Settle on one primary style for your main product listings and then get creative for your marketing channels.
How Can I Make Sure My Product Colors Are Accurate?
Getting colors wrong is one of the fastest ways to rack up customer returns. If a customer orders a "deep forest green" shirt and gets something that looks more like lime green, you've got a problem.
The most bulletproof way to guarantee color accuracy is to use a grey card or color checker when you're shooting. It’s a simple, cheap tool that gives you a perfect neutral reference point.
When you get into your editing software, make sure you're working on a calibrated monitor. Then, just use the white balance tool (it's usually an eyedropper icon) and click on the grey card in your reference shot. This will instantly neutralize any weird color casts from your lighting. Always do a final gut check by comparing the edited image on your screen with the actual product in person, ideally under natural light.
Getting color right isn't just an aesthetic choice—it's a business decision. Accurate colors build trust, set correct customer expectations, and directly reduce your return rate, saving you money and protecting your brand's reputation.
Should I Hire a Pro or Use an AI Editor?
This really boils down to three things: your budget, how many products you have, and how fast you need to move.
Hiring a professional photo retoucher will get you high-quality, custom results every time. But that quality comes at a price. It can get incredibly expensive and slow you down, especially if you have a huge catalog or are constantly adding new products. For most growing businesses, it’s just not a scalable solution.
This is where modern AI editing tools like PhotoAI Studio have really changed the game. They offer a powerful, cost-effective alternative by automating the grunt work—things like background removal, color correction, and shadow creation—for thousands of images at once. For a deeper look at different editing workflows and tips, our PhotoAI Studio blog has tons of resources. For most ecommerce stores today, leaning on AI is the smartest way to get professional-looking photos without the professional price tag.
Ready to transform your product photos with unmatched speed and consistency? PhotoAI Studio uses powerful AI to automate background removal, generate stunning lifestyle scenes, and create professional-quality images in minutes, not hours. Try PhotoAI Studio today and see the difference AI can make.


