
An AI image extender is a pretty incredible piece of tech that uses generative AI to expand a photo way beyond its original borders. It intelligently adds new, context-aware content that looks like it was always there.
This technology, often called outpainting or generative fill, is the perfect fix for turning a tightly cropped photo into a wide banner or resizing a horizontal shot for a vertical format like an Instagram Story.
The Creative Power of AI Image Extenders
Ever taken the perfect headshot, only to realize you needed way more background space for a website banner? Or captured a stunning landscape photo that was just a bit too narrow for the print you wanted to make?. Check out our AI professional headshots.
These are the kinds of creative roadblocks that used to require hours of tedious cloning and patching in Photoshop, often with mediocre results. An AI image extender completely sidesteps that headache, solving the problem in seconds.

This tech is smart. It analyzes the existing pixels, textures, lighting, and subjects in your photo. Then, it generates brand-new visual information that logically and seamlessly extends the scene. Instead of just stretching pixels and destroying the quality, it actually creates new, authentic-looking content from scratch.
Fixing Common Visual Bottlenecks
This capability is way more than just a cool party trick; it’s a practical solution for the daily grind of content creation. The market is exploding for a reason.
The AI image enhancer market was valued at a massive USD 2.6 billion in 2024 and is projected to hit an unbelievable USD 50.7 billion by 2034. That explosive growth shows just how essential these tools are becoming for professionals and creators everywhere. If you're curious, you can dive deeper into the AI image enhancer market trends to see the full picture.
Ultimately, an ai image extender acts as your creative safety net. It gives you the power to reframe and repurpose any image without having to go back and reshoot it. It’s all about adding flexibility to your visual assets.
The real benefit isn't just adding more 'image' to your image. It's about unlocking new compositions and formats that were previously impossible without a reshoot or complex manual editing.
These tools solve a ton of common, frustrating problems that creators face every day. Here’s a quick look at how they turn a headache into a simple fix.
Common Problems Solved by AI Image Extenders
| The Problem | The Traditional (Difficult) Fix | The AI Image Extender Solution |
|---|---|---|
| The photo is cropped too tight. | Hours in Photoshop using the Clone Stamp and Content-Aware Fill tools, often with visible seams or repetitive patterns. | Instantly generate new, realistic background in any direction to create breathing room and better composition. |
| Need to change a photo's aspect ratio. | Crop the image, losing important details, or manually add blurred bars on the sides (the pillarbox/letterbox effect). | Expand the canvas to the desired aspect ratio (e.g., from 4:3 to 16:9) and let the AI fill in the new space seamlessly. |
| Product shots lack background space for text. | Manually extend a simple background, which is tricky with textures or gradients. A reshoot is often the only option. | Add more clean, consistent background to one side, creating perfect negative space for ad copy or logos. |
| A great vertical photo needs to be a horizontal banner. | Stitching multiple photos together (if you have them) or trying to stretch and distort the image, which ruins quality. | Expand the image horizontally, letting the AI generate new content that matches the original scene's lighting and style. |
As you can see, what used to be a technical chore is now a simple, creative task. This opens up a world of possibilities that just weren't practical before.
Key Scenarios for Image Extension
Just think about the practical, day-to-day situations where a tool like this becomes a total game-changer:
- Social Media Content: A single product photo can be expanded to perfectly fit the unique aspect ratios of Instagram Stories (9:16), feed posts (4:5), and YouTube thumbnails (16:9), keeping your brand looking sharp and consistent everywhere.
- Product Photography: You can take a clean shot of a product on a simple background and then extend that background to create a spacious, professional hero image for a website homepage or a promotional banner.
- Headshots and Portraits: Extend the background of a professional headshot to add more negative space. This simple change can make it far more suitable for profile banners, ad creatives, or article illustrations where text needs to be overlaid.
- Artistic Creation: For digital artists, an extender is a dream. You can add more sky to a landscape, expand a busy street scene, or simply give yourself more canvas to work with while perfectly maintaining the style of your original artwork.
By intelligently filling in the blanks, this technology empowers you to adapt your visuals on the fly. It saves a ton of time and unlocks creative potential that was once locked down by the original frame of the photo.
How to Choose the Right AI Image Extender
Picking the right AI image extender is about more than just finding a tool that can slap a few extra pixels onto your canvas. On the surface, lots of apps can do that. The real difference is in the quality and control you get, which ultimately determines whether your final image looks seamless or like a botched Photoshop job.
The first thing I always look for is prompt control. A basic tool might just guess what to add to the background, which is a recipe for disaster. A professional-grade extender, on the other hand, lets you guide the AI with a text prompt. Instead of hoping for the best, you can tell it exactly what you want: "add a calm, blue ocean with gentle waves" or "extend the wooden tabletop with a soft, out-of-focus background." This is the non-negotiable feature for anyone who cares about matching a specific creative vision.
Evaluating Core Technical Capabilities
Next up is context awareness. The smartest tools don't just generate new pixels; they act like a skilled photo editor, analyzing the original image's lighting, shadows, textures, and even color grading. A top-tier AI will ensure the new additions blend perfectly with the existing scene, maintaining a consistent and believable feel. Without this, you get those jarring transitions that scream "AI-generated!" and ruin the whole effect.
Resolution handling is another deal-breaker. A great tool shouldn't just expand the image; it needs to preserve the quality of what's already there.
The secret weapon here is an integrated AI upscaler. This lets you expand your canvas and then enhance the entire composition. The result is a final image that’s sharp, clear, and ready for high-resolution uses like printing or big digital displays.
Beyond Extension: Integrated Editing Tools
A truly powerful platform is never a one-trick pony. The best AI image extenders are part of a complete editing suite. For instance, a platform like Photo AI Studio rolls a bunch of essential features into one place:
- Background Removal: Perfect for cutting out your subject before dropping them into a completely new, AI-extended scene.
- Object Inpainting: Lets you clean up any weird artifacts or unwanted elements the AI might have generated in the new areas.
- Comprehensive Editing: All the classic controls—brightness, contrast, color—to harmonize the original and extended parts of the photo.
Having these tools together in one workflow saves you from the frustrating process of bouncing between different apps. This kind of integration is why the AI Image Editor market is booming, valued at USD 88.7 billion in 2025 and part of a much larger global AI movement. You can dive deeper into these trends in AI image statistics to see just how fast things are moving. By choosing an all-in-one tool, you're not just getting an extender; you're setting yourself up to tackle any creative challenge that comes your way.
For more hands-on tips, feel free to explore our other guides on the Photo AI Studio blog.
Extending Your First Image from Start to Finish
Alright, let's move from theory to practice and actually uncrop your first image. This walkthrough is all about the practical steps that take a good photo and turn it into the perfect asset for whatever you're working on.
First thing's first: you need a solid source image. You'll get the best results from photos with a clear subject and a background that has somewhat predictable patterns. Think skies, simple textures, or studio backdrops. Try to avoid images where your main subject is awkwardly sliced off right at the very edge, as this can sometimes throw the AI for a loop.
Defining Your Canvas and Crafting Your Prompt
Got your photo? Great. Now you need to decide what the new canvas looks like. Are you turning a square Instagram post into a vertical Story? Or maybe expanding a portrait shot into a wide banner for your website? Set your new aspect ratio first. This tells the ai image extender where it needs to work its magic.
Now for the fun part—writing the prompt. This is your direct line to the AI, and a good prompt makes all the difference. You don't need to write a novel; being clear and specific is what counts.
- For a simple landscape: A prompt like "extend the blue sky and fluffy white clouds" is direct and gets the job done.
- For a product shot: Something more descriptive works better, like "add a clean, minimal wooden table surface below the coffee cup, with soft morning light."
- For a portrait: You could go with "expand the background with a blurred, modern office interior."
These prompts give the AI the context it needs, making sure the new pixels align with your vision instead of leaving it all up to chance. And if you happen to be working with headshots, you might find our guide on creating a free professional headshot with AI useful.
To help you choose the right tool for the job, this flowchart breaks down the most important features to look for.
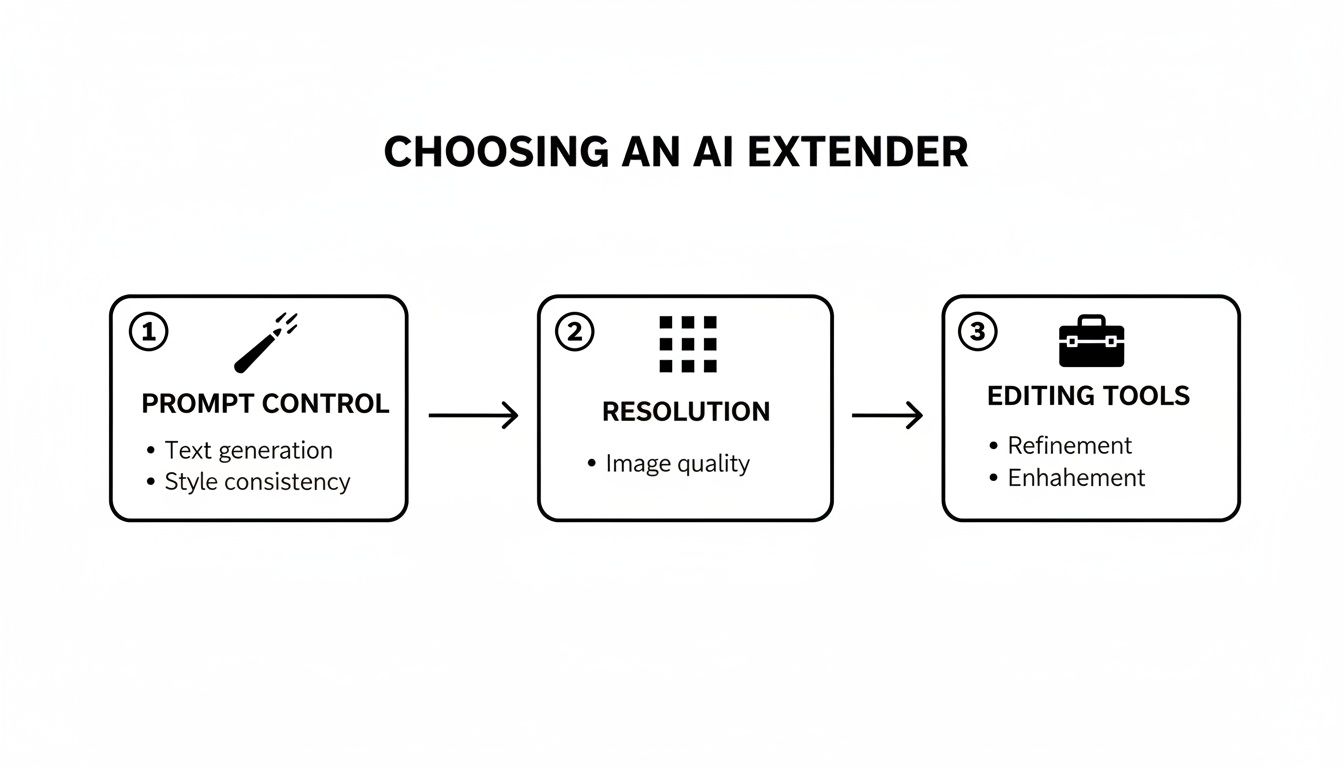
As you can see, the sweet spot is finding a tool that combines precise prompt control, high-resolution output, and some decent editing tools. That’s what separates a basic toy from a professional-grade extender.
Iterating for the Perfect Result
The AI’s first attempt is often impressive, but it’s rarely perfect. This is where iteration comes in. Don't be afraid to hit that "regenerate" button if you're not satisfied. Most tools will even spit out several variations at once, giving you a few options to choose from right away.
Sometimes, just a tiny tweak to your prompt can lead to dramatically different results. If the AI added something weird, try adding a negative prompt like "no people" or "no text" to steer it in the right direction.
The goal of the first generation isn't perfection; it's to get a creative baseline. Your best work will come from refining the prompt and regenerating sections until the composition feels just right.
Think of it as a collaboration. You bring the vision through your prompt, and the AI handles the technical execution. By looking at what it gives you and adjusting your instructions, you can guide the tool toward the exact outcome you need, ensuring your final image looks completely seamless.
Pro Techniques for Flawless Image Extensions
Once you’ve got the hang of basic image extending, it’s time to move on to the techniques that create truly professional, seamless results. This is where you graduate from simply adding more canvas space to intentionally shaping the entire scene.
These are the methods that separate a decent AI edit from a completely undetectable one, giving you total creative control.
One of the most powerful tools in your kit is the negative prompt. Your main prompt tells the AI what to create, but a negative prompt tells it what to leave out. This is your secret weapon for fixing common AI mistakes.
For instance, if the extender keeps adding blurry people or weird, distracting text in the background, a simple negative prompt like "no people, no text, no logos" will instantly clean up your output.
Mastering Stylistic Consistency
The ultimate goal is for the new pixels to perfectly match the original. You don't want any jarring transitions. The key is to look closely at your source photo and feed its core characteristics back to the AI. You can also check out our AI dating profile photos.
- Lighting and Shadows: Does your photo have that crisp, hard light from direct sun, or is it a softer, more diffused light? Mention this in your prompt. Something like, "extend with soft afternoon lighting coming from the left" works wonders.
- Texture and Grain: If your original image has a bit of film grain or a specific texture, you need to match it. Adding "subtle film grain" or "slight paper texture" to the prompt helps maintain that cohesive aesthetic.
- Color Palette: You can steer the AI’s color choices to keep the mood consistent. A prompt like, "add a background with muted, earthy tones" is far more effective than leaving it to chance.
This level of control is a game-changer for professional work. In Product Photography, for example, you can take existing shots and perfectly reframe them for different ad formats while keeping the brand's specific look and feel.
The best extensions are the ones you don’t even notice. Success is when the AI-generated pixels are stylistically identical to the photographer's original work, from the lighting right down to the noise pattern.
Advanced Compositional Strategies
Sometimes, one simple extension just won't cut it. For those big, dramatic expansions, you’ll want to use a technique called chaining.
It’s pretty straightforward: you extend the image in one direction, save that new, bigger image, and then re-upload it to extend it in another direction. By building out the scene piece by piece, you can create massive, detailed canvases that would be impossible with a single generation.
Another pro-level trick is using inpainting to make corrections. Even the best AI can drop in a weird artifact or an element that feels out of place. Instead of regenerating the entire extension and losing what you liked, you can use an inpainting tool.
Just select the flawed area and prompt the AI to fix only that spot. This gives you surgical precision to perfect the final image. When you start combining these methods, the AI extender becomes less of a simple tool and more of a powerful creative partner.
Real-World Examples for Marketers and Creators
Let's get practical. Theory is great, but the real power of an AI image extender clicks into place when you see how it solves the annoying, everyday problems that content creators and marketers face.
The biggest win here is efficiency. This tool is a massive time-saver for anyone juggling multiple platforms, each with its own bizarre image dimension requirements. Instead of scheduling a whole new photoshoot just to get a vertical shot, you can now adapt one killer image for every single need.
For Social Media Managers
You know the drill. You have one fantastic horizontal photo from a product launch, but you need to post it to Instagram Stories. In the past, this meant a painful choice: awkwardly crop the photo and lose half the context, or settle for those ugly, blurred borders that scream "I didn't have time to do this right."
Now, you just expand the image vertically.
- Original Image: A slick 16:9 landscape photo of a new sneaker.
- The Goal: Whip up a 9:16 Instagram Story and a 4:5 feed post.
- The Prompt: "Extend the clean, concrete studio floor below and the soft, grey backdrop above the sneaker."
The AI fills in the gaps, giving you perfectly formatted assets that look like they were shot that way from the start. This is quickly becoming the new standard, especially when you consider that 71% of consumers already assume AI-generated images are common on social media anyway.
For E-commerce Brands
Here's a classic headache for online stores: turning a standard product-on-white-background photo into a compelling website hero banner. You desperately need more space on the sides for headlines and a "Shop Now" button, but the original photo is cropped way too tight.
An AI image extender fixes this in seconds. Take a clean shot of a handbag, for instance, and just stretch it sideways.
- The Prompt: "Expand the image to the left, adding more of the same minimal, light-grey textured background."
- The Result: Instantly, you have a wide, spacious banner with all the negative space you need for text. You've just turned a basic product shot into a high-impact marketing graphic.
For marketers getting into this, it’s worth checking out the full ecosystem of the top AI tools for ecommerce to build out a truly efficient workflow.
The real magic is repurposing. An AI image extender multiplies the value of every photo you take by unlocking endless compositional possibilities without needing a camera.
This change in how we create content is fueling some serious market growth. The synthetic image generation market, which covers these tools, is on track to hit USD 2.36 billion by 2025. This isn't just a niche trend; it's being driven by massive adoption, with 20% of Americans having already used AI to create visuals. If you want to dive into the numbers, you can find more details about the synthetic image generation market here.
These examples aren't just hypotheticals. They show how image extension has moved from a cool novelty to a practical tool for pumping out high-quality, versatile content at scale. You can even push this further by using an AI influencer generator to create entirely new marketing assets from scratch.
Your Questions About AI Image Extenders, Answered
Jumping into any new creative tool brings up questions. That's a good thing. Getting solid, practical answers is the fastest way to build confidence and start making cool stuff right away.
Let's tackle some of the most common questions that come up when people first start using AI to expand their images.
Will Extending an Image Mess Up the Quality?
This is the big one, and the answer really comes down to the tool you’re using. A top-tier AI image extender is built to do one thing really well: analyze the pixels in your original photo—the resolution, the texture, even the film grain—and then generate new pixels that are a perfect match. The goal is a seamless blend.
That said, you can't make a masterpiece from a mess. Starting with a high-resolution photo is always your best bet. Think of it as giving the AI a better blueprint to work from. Many of the best platforms, including ours, also bundle in an AI upscaler. This is a game-changer because you can extend the canvas first and then sharpen up the entire image, making sure the final version is crisp enough for anything from a website hero to a physical print.
What Kinds of Photos Are Easiest to Extend?
AI image extenders are more flexible than you might think, handling everything from landscapes and portraits to product shots with surprising skill. But if you want the cleanest, most predictable results, start with images that have a relatively simple or consistent background for the AI to build upon.
A few examples of what works really well:
- Open skies, whether they're clear blue or full of clouds
- Natural textures like water, sand, or grassy fields
- Simple studio backdrops or plain walls
- Consistent patterns like a wooden tabletop or a fabric surface
Images with really chaotic, complex patterns or where the main subject is chopped off right at the very edge of the frame can be trickier. The AI might get a little confused. My advice? Start with simpler photos to get a feel for how the tool thinks before you throw a super complex composition at it.
What About Copyright? Am I Allowed to Do This?
This is a critical question for any professional. The good news is, it's usually pretty straightforward. If you own the copyright to the original photo, you also own the rights to the newly extended version you create with AI. The generated parts are considered a derivative work, which falls under your ownership.
But here’s the non-negotiable part: Always read the terms of service of the specific AI tool you're using. Policies can vary. The golden rule is simple: never, ever use a source image you don’t have the legal right to alter. Stick to your own photography or properly licensed stock photos.
Keep these points in mind, and you can use an AI image extender with total confidence, creating high-quality, legally-sound visuals for all your projects.
Ready to see what's possible when your creative canvas has no limits? With Photo AI Studio, you can extend, upscale, and completely reimagine your images using a powerful suite of AI tools. Head over to https://photoaistudio.com and start creating something amazing today.


